

Most British homes in Bristol and South Gloucestershire face security risks from outdated or poorly installed window locks. With DIY upgrades, you can reduce burglary risk by as much as 40 percent, yet many homeowners feel unsure about where to start. Choosing the right lock for your window style is crucial for safe, effective protection. This guide breaks down each step so you can confidently install the best security features for your home without specialist experience.
Table of Contents
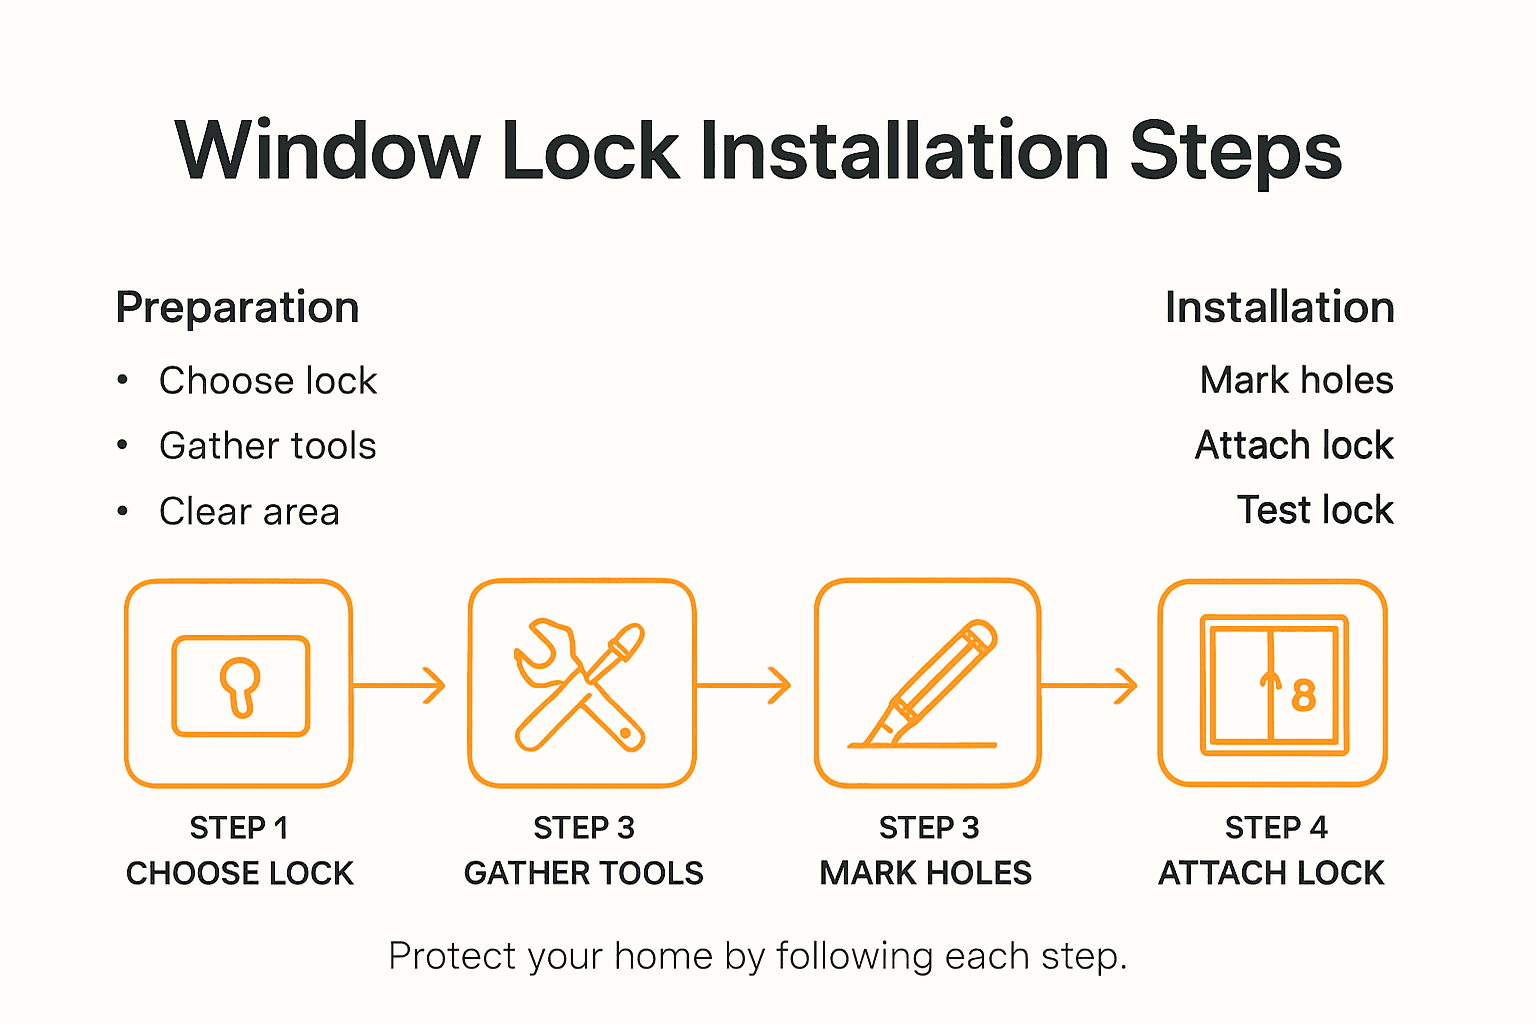
- Step 1: Assess Window Type And Select Suitable Lock
- Step 2: Prepare Tools And Clear Installation Area
- Step 3: Mark Lock Position And Drill Guide Holes
- Step 4: Attach Lock Mechanism Securely To Window
- Step 5: Test Lock Functionality And Make Adjustments
Quick Summary
| Key Point | Explanation |
|---|---|
| 1. Match lock to the window type | Different window types require specific locking mechanisms for optimal security. |
| 2. Prepare tools and workspace | Gather necessary tools and clear the installation area for efficient and safe work. |
| 3. Mark and measure accurately | Precise marking prevents installation errors and ensures lock functionality. |
| 4. Securely attach the lock | Proper installation is essential for the lock’s effectiveness and long-term durability. |
| 5. Test lock thoroughly | Conduct multiple tests after installation to ensure the lock functions reliably. |
Step 1: Assess the window type and select a suitable lock
Identifying the right window lock starts with understanding your window’s specific characteristics. Different window styles require unique locking mechanisms, so careful assessment is crucial before purchasing or installing any security device.
First, examine your window’s material and configuration. Older timber windows need different locks compared to modern UPVC frames. Examples of lock mechanisms for local homes reveal how critical matching the lock to the frame. Casement windows typically use espagnolette locks with multiple locking points, while sliding sash windows require separate sash locks that prevent vertical movement.
Measure your window frame precisely and check existing lock positions. Some locks require specific hole placements or mounting configurations. Consider the window’s age, frequency of use, and exposure to external elements. A kitchen window that opens frequently needs a more robust mechanism than a decorative bathroom window.
Expert advice: Always purchase window locks from reputable manufacturers that meet British Standard security requirements, ensuring maximum protection for your home.
Here’s a quick comparison of common window types and their ideal locking mechanisms:
| Window Type | Typical Material | Best Lock Type | Key Security Advantage |
|---|---|---|---|
| Casement | Timber or UPVC | Espagnolette multipoint | Multiple locking points for safety |
| Sliding Sash | Timber | Dedicated sash locks | Prevents vertical movement |
| Tilt and Turn | UPVC | Internal locking handles | Secure from inside only |
| Fixed Picture | Timber or UPVC | Concealed deadbolts | No external opening possible |
Step 2: Prepare tools and clear the installation area
Getting ready for your window lock installation requires careful preparation and organisation. Your success depends on having the right tools and a clean workspace that allows you to work efficiently and safely.
Fire door installation guidelines highlight the importance of creating a well-prepared workspace before beginning any hardware fitting. Gather all necessary tools beforehand including a drill, screwdriver set, tape measure, spirit level, pencil, and safety glasses. Ensure you have the correct drill bits matching your window frame material and lock specifications.
Clear the area around your window completely. Remove curtains, blinds, and any fragile items that might get damaged during installation. Lay down a protective cloth or dust sheet to catch debris and protect your floor or windowsill. Check that you have good lighting and a stable work surface with enough room to manoeuvre your tools and lock components safely.
Expert advice: Lay out your tools and lock mechanism in the order you will use them to streamline your installation process and minimise potential errors.
The following table provides a summary of essential installation tools and their purpose:
| Tool | Purpose | Why It’s Important |
|---|---|---|
| Spirit Level | Ensures horizontal alignment | Prevents uneven installation |
| Safety Glasses | Protects eyes during drilling | Essential for installer safety |
| Tape Measure | Accurate frame measurements | Guarantees correct lock fitment |
| Screwdriver Set | Fastens lock components | Required for secure attachment |
Step 3: Mark lock position and drill guide holes
Precision is paramount when marking your window lock installation points. A carefully planned approach ensures your new security mechanism fits perfectly and functions smoothly.
Metalwork workshop guidelines emphasise the critical importance of accurate marking and measuring before drilling. Start by holding your lock mechanism against the window frame and use a pencil to lightly mark the exact drilling points. Use a spirit level to guarantee horizontal alignment, preventing uneven lock installation. Measure twice and mark carefully to avoid unnecessary holes or misalignment that could compromise the lock’s effectiveness.
Double-check your measurements before drilling. Identify the correct drill bit size for your specific window frame material. For wooden frames, use a drill bit slightly smaller than your screw diameter to prevent splitting. For UPVC frames, select a masonry bit that matches the lock manufacturer’s recommendations. Position your drill perpendicular to the surface to ensure clean, straight holes that will securely anchor your new lock mechanism.
Expert advice: Always place a piece of masking tape on your drill bit to mark the precise drilling depth and prevent accidentally drilling through your window frame.
Step 4: Attach the lock mechanism securely to the window
Securing your window lock requires careful alignment and precise installation to ensure maximum protection for your home. Each screw and component plays a crucial role in creating a robust security barrier.
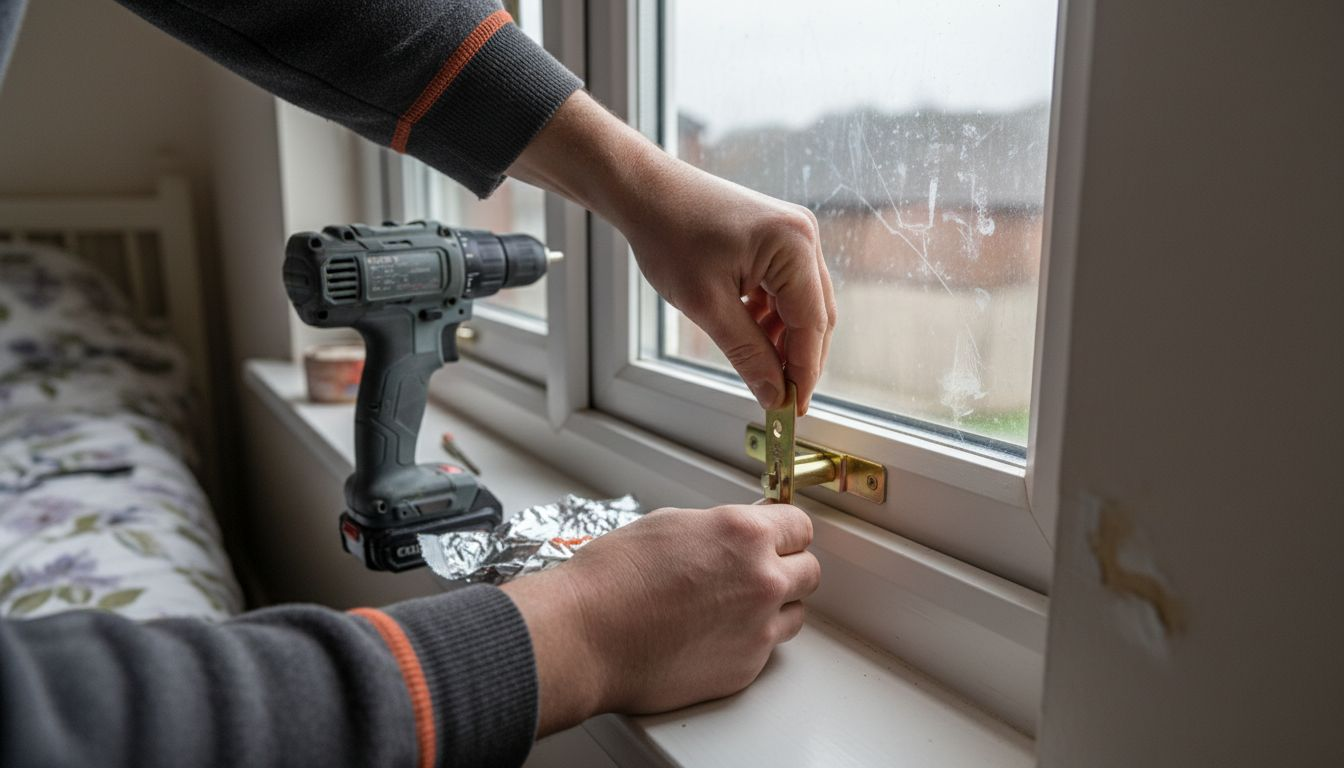
Begin by aligning the lock mechanism exactly with the pre-drilled holes. Key examples of lock mechanisms demonstrate the importance of proper positioning. Insert screws gradually and evenly, alternating between different sides to maintain uniform pressure. Do not overtighten, as this can distort the lock mechanism or damage the window frame. For wooden frames, use wood screws with a coarse thread. For UPVC frames, select specialised frame fixing screws designed to create a strong mechanical bond.
Test the lock mechanism immediately after installation. Open and close the window multiple times to verify smooth operation and ensure the lock engages correctly at all points. Check that the lock sits flush against the window frame with no visible gaps or misalignment. A properly installed lock should feel solid and provide resistance when attempted to be forced open.
Expert advice: Apply a small amount of silicone lubricant to the lock mechanism during installation to reduce friction and ensure smoother long-term operation.
Step 5: Test lock functionality and make adjustments
After installation, thoroughly testing your new window lock ensures it provides the security protection your home deserves. A comprehensive functionality check will reveal any potential issues that need immediate attention.
Lock maintenance checklist recommends performing multiple operational tests to verify the lock’s reliability. Begin by repeatedly opening and closing the window while engaging and disengaging the lock mechanism. Check for smooth movement without sticking or resistance. Ensure the lock fully secures the window at multiple points along the frame and creates a tight seal when closed.
Look for any signs of misalignment or gaps that could compromise security. If the lock does not sit flush or seems slightly off centre, you may need to loosen the screws and realign the mechanism carefully. Pay attention to how firmly the lock grips the window frame. A well-installed lock should provide noticeable resistance when attempting to manipulate it and prevent the window from being forced open from the outside.
Expert advice: Perform your lock functionality test at different times of day and in various temperature conditions to ensure consistent performance across different environmental scenarios.
Enhance Your Home Security with Expert Window Lock Installation
Installing the right window lock starts with understanding your window type and selecting a secure mechanism that fits perfectly. This article highlights key challenges such as precise lock positioning, correct drill guide holes, and testing lock functionality to protect your home effectively. If you feel overwhelmed by the technical steps or want to ensure your locks meet British Standard security requirements, professional help can provide peace of mind and guaranteed security.
At AHLP Locksmiths, we specialise in comprehensive Locksmith Services – Auto Home Lock Pro tailored to secure your windows and entire property throughout Bristol, South Gloucestershire, and Gloucester. Our expert team uses quality insurance-approved hardware and handles all lock types with precision. Don’t risk weak installation or misaligned locks that leave your home vulnerable. Contact our Local Locksmith – Auto Home Lock Pro team now for trusted advice and prompt service.
Secure your home without delay by booking a visit at https://ahlp.co.uk/contact/ and experience a hassle-free upgrade to your window security. Act today to protect what matters most with AHLP Locksmiths, your reliable partner in home safety.
Frequently Asked Questions
What type of lock should I use for my casement window?
To secure your casement window effectively, use espagnolette multipoint locks, which provide multiple locking points for added safety. Assess your window frame to ensure you purchase a lock that matches its specifications.
How do I prepare my work area for window lock installation?
Clear the area around the window by removing curtains, blinds, and any fragile items. Lay down a protective cloth to catch debris and ensure proper lighting for a safe installation process.
What measurements are necessary before drilling for the lock?
Before drilling, accurately measure the positions of the existing lock and mark the drilling points with a pencil. Use a spirit level to ensure the marks are horizontally aligned for proper installation of the lock.
How do I test the functionality of my new window lock?
After installation, test the lock by opening and closing the window while engaging and disengaging the mechanism several times. Ensure the lock operates smoothly and sits flush against the window frame without gaps.
What should I do if my window lock does not sit flush after installation?
If the lock does not sit flush, loosen the screws and realign the mechanism carefully before retightening. This adjustment will help ensure that the lock engages properly and maintains the window’s security.
How can I improve the long-term performance of my window lock?
Incorporate a small amount of silicone lubricant into the lock mechanism during installation to reduce friction. Regularly check the lock’s functionality and perform maintenance every few months to ensure consistent performance.